
This article will outline six bad habits that you can change immediately–for free–that will give you an immediate return on investment (ROI).
Listen to our interview about this topic on the Pool Chasers Podcast:
Covered in this article:
- 6. Not measuring chemicals (eye-balling)
- 5. Not measuring pool volume
- 4. Ignoring water temperature and the LSI
- 3. Neglecting Test Kits (especially in the sun)
- 2. Chasing pH
- 1. Abusing Acid
6 bad habits in pool care that waste more money and time than you might think
ROI is pretty easy to show when the habits cost nothing to change. As many of reading this know, Orenda has visited countless pools while supporting our customers in the field. Nobody ever invites us to their good pools; only the struggling ones. We have seen enough common problems around the country to know when bad habits are pervasive nationwide. These are common issues everywhere we go. So if these sound painfully familiar to you, you are not alone.
We will outline the bad habits and share with you the best-known practices to replace them with. It is then up to you to implement and reap the rewards. If you follow our advice, you are sure to:
- Spend less money on chemicals
- Spend less time on problem pools (because there will be less of them), and
- Increase profitability WITHOUT charging your customers more.
- Increase customer satisfaction
6. Not measuring chemicals (eye-balling)
 Water chemistry is a science, much like cooking. The best chefs in the world may seem like artists on TV, but they are following recipes–even if only in their head. Sure, at the elite level, chefs have adapted procedures and recipes because they have so much experience practicing, practicing, and practicing more. But do not be fooled! The best chefs in the world use measuring cups, kitchen scales and other tools to make sure their food chemistry is accurate.
Being off on chemical dosing, even slightly, adds up over the course of a season. These costs compound over multiple pools on a route. We have helped pool service companies save thousands of dollars in a single season by learning and following the Orenda program. And a key part of our program is simply measuring before you pour.
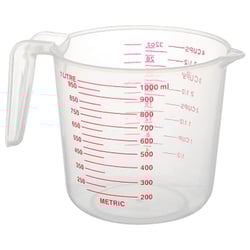
Do you have measuring cups in your service vehicle? One for dry chemicals, and one for liquids? If you don't have measuring cups, invest the few dollars in yourself and get one for liquids and one for dry chemicals. This habit change is almost free...but not quite. Sorry.
Not dosing chemicals properly either...
Following this same train of thought, many of us think we know how much of a given chemical it will take to make a correction. For instance, "about a half-gallon of liquid chlorine this week", or "2 scoops of shock." But while trusting our gut may make a pool visit go faster, it rarely makes that visit better or more profitable.
Best-known practices: Measure and dose chemicals accurately
Let's stop eyeballing chemicals and assuming we know the correct dosages. Test the water and use the tools available, like the Free Orenda app. And once you have your measuring cups, use them. For everything. Especially acid, which we will cover later in this article. You might be surprised at how much less you are spending on chemicals simply by measuring. Eyeballing chemicals is a bad habit that needs to be stopped. This brings us to our next bad habit...
5. Not measuring pool volume
 Do you know the actual volume of that pool you're looking at? If not, then the Orenda App calculator doesn't either. Garbage in, garbage out. The bad habit here is assuming or just guessing the volume of a pool without actually measuring it. Sure, nobody can get the volume perfect, but taking the time to measure dimensions and depths can get you much closer than just trusting your gut.
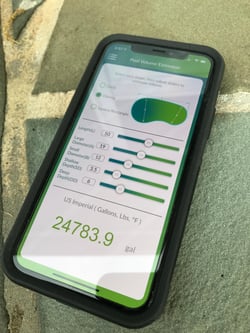
The Orenda App has a Pool Volume Estimator tool. It's the second option on the main menu, below the LSI calculator. Free-form pools are not the easiest things to measure, but you can estimate the volume for rectangular, circle, and oblong (kidney) shaped pools. The formula is from the NSPF CPO® book, using 7.48 gallons per cubic foot of water. And, our app has a metric conversion to estimate liters too.
An even more accurate option is to contact the pool builder. Pool design software generally gives a pretty specific gallonage to a given shape. The builder should be able to go back in their files and find the pool volume for you. And for the pool builders reading this: you could do everyone a favor by simply printing the exact pool volume somewhere on the equipment set. That way, there is no question about the pool volume. It's right there.
Finally, if you want to put on your lab coat and get really accurate on the pool volume, there is a method of chemically measuring the pool. You'll need to dilute your water sample by 10x, and measure alkalinity as directed in the procedure.
Why pool volume matters so much
It is not uncommon to estimate wrong on pool volume by at least 1000-3000 gallons (3,785-11,356 L) in a typical backyard pool. Unfortunately, we see it all the time. If you underestimate the pool, you will not be treating it as effectively and could run into issues. But usually, we see overestimations. So let's say, for example, you have what you think is a 30,000 gallon (113,562 L) pool. But in reality, it's a 27,000 gallon (102,206 L) pool. That's a 10% smaller pool than you think you have. That 10% gap leads to 10% more money on chemicals, assuming you are dosing and measuring chemicals correctly.
Add that up over a full season. Then repeat this exercise for all the pools on your route. 10% may not seem significant for one pool. But when you do the math, you will realize it's enormous. This is one of the easiest ways to save money AND deliver a better service to the customer.
Best-known practices: Calculate pool volume and document it
Measure the pool volume, and clearly write it somewhere on the equipment set. Either get a label maker and adhere it to a piece of equipment that will not get deteriorated by weather, or just use a sharpie. The most accurate pool volume you can calculate should be written clearly at the equipment set. And of course, the second part of this practice is to read the number and use it when calculating chemical dosages.
4. Ignoring Water Temperature and the LSI
Orenda fans, you knew we couldn't write an article without bringing up the Langelier Saturation Index (LSI)! We beat the drum of water balance because it matters so much. This topic is so important, it is our First Pillar of Proactive Pool Care. An LSI-based chemistry strategy outperforms a range-chemistry strategy every time. One of the main reasons why, is factors that don't have an "acceptable range"; namely, water temperature.
If you think you can have the same chemistry parameters in the winter as you do in the summer, think again. Water temperature changes the LSI in a big way, and cold water becomes more aggressive. When the water is, say, 50ºF (10ºC), maintaining a 7.4 pH is almost assuredly going to etch the plaster, fade the vinyl liner, or deteriorate the gelcoat of a fiberglass pool. With a pH in the "ideal range" of 7.4 to 7.6, there are other parameters that must be increased to make up the difference when the water is cold, like calcium hardness and alkalinity.
Of the six LSI factors, water temperature is the easiest and most accurate to measure; yet it is the most neglected. Why? According to pool pros all around the country that we have talked to, most of us are unaware that water temperature impacts pool chemistry. It does.
Best-known practices: Measure temperature and use the LSI
Every pool professional should have a thermometer with their test kit. There are digital ones, but we like the analog ones on a string. Tie the string to the handle of your test kit to remind you to bring it with you. And even better, encourage every customer to have a thermometer in their swimming pool! As an aside, we know many equipment sets and controllers display a water temperature...but that's not as reliable as something in the pool. The equipment set is measuring temperature in the pipes.
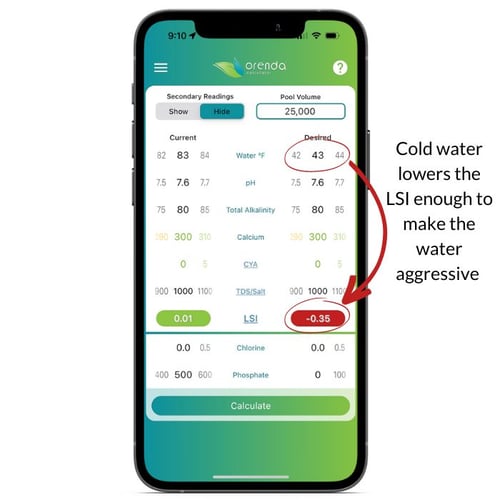
So the best practice is to measure water temperature every time and factor it into your LSI calculation. The Orenda App does all the math for you. You just need to measure and input the factors, and adjust accordingly.
In the image below, we have the Orenda App LSI calculator, side by side. All that was changed on the first screen is the water temperature, from 80ºF to 32ºF (freezing). It took beautifully balanced water and made it aggressive. In order to compensate for that, you as a pool operator need to adjust the chemistry so that the water at 32ºF (0ºC) will still be LSI-balanced (a green number on the calculator). In the example below, we raised the calcium from 280 up to 550 ppm, let the pH climb from 7.7 to 7.9, and raised alkalinity up to 200 ppm. There are many different ways you can balance cold water, so play with the app and decide for yourself how you want to do it.
You can predict future temperature swings (like winterization) because you know your climate. Prepare your water accordingly. It's that simple, and apart from a few bucks for an analog thermometer, it costs you nothing.
And speaking of testing water chemistry...
3. Neglecting Test Kits (especially in the sun)
Test kits are not made to be left out in direct sunlight all day. For reagent test kits, extreme heat can foul the reagents and ruin them. We often see test kits left out in the back of service trucks in the parking lots of distributors we visit. This habit is not isolated to any one area of the country...we see it almost everywhere.
Test strip kits should not be left out in the sun either. And if you use test strips, be sure your hands are dry! Just a drop of water in the bottle of test strips can ruin all of them. Electronic test kits are less impacted by sunlight, but need to be calibrated and charged. If they are battery powered, keep replacement batteries in your service vehicle so you can always have a working tester. And even for electronic testers (like photometers), heat and humidity can still affect the reagents.
And in this same vein, the temperature of the water sample can impact results too! If your water is below 50ºF (10ºC), reagent test kits are less accurate, or at least take longer to develop accurate results. To be safe, let's say if your water is colder than 60ºF (15.5ºC), it is a good idea to warm up the water sample–in your pocket or in your truck–before testing it to get a more accurate reading. Follow the instructions and wait the amount of time provided by the test kit manufacturer.
The trap here is you may think the kit is still working accurately, but how do you know? Inaccurate testing is kind of like not knowing the actual volume of your swimming pool. It doesn't matter how diligent you are, you're going to be making the wrong chemical adjustments. Accurate testing is critical for making the right treatment decisions.
Best-known practices: Care for your kits, and verify their accuracy
Take care of your test kit! It is one of the most important tools of the trade, and needs to be kept with care. So stop leaving test kits in the back of your truck. Instead, store yours in the cab of your vehicle in the shade, like under a seat. An even better place is in a cooler. Bring the test kit indoors overnight during the summer if it's really hot all night, OR if it's really cold outside.
For test strips, tilt the container and shake it lightly so the handles of the strips start to come out, and then grab only one strip you are going to use, without touching others. Prevent moisture from getting into the container, and immediately close the container once you have your strip. For electronic test kits, calibrate them as often as the instruction manual says to do so. Follow manufacturer guidelines.
When in doubt, double-check your test with a different type of test kit if...
- the test results are considerably outside the normal range,
- the test results are considerably different from the last test at the pool, or
- you feel for any other reason the test result might not be accurate.
Do these things so you have accurate chemistry readings for things like calcium hardness, alkalinity, and pH. Hey, while we're talking about pH, that's bad habit #2...
2. Chasing pH

It is astounding how many pool professionals try to control the pH of a swimming pool. pH is a logarithmic measure of the power of Hydrogen (or "potenz Hydrogen"). Every whole number from 0-14 is 10x different than the next whole number. So 6 is ten times more acidic than 7. But 5 pH is 100 times more acidic than 7, so on and so forth. It's easy to lose sight of just how drastic pH can swing. Here are a few examples to put pH in perspective:
- Sodium Carbonate (Soda Ash) is about 1000-times more basic than Sodium Bicarbonate.
- Trichlor is just over 10,000-times more acidic than neutral (7 pH) water.
- Muriatic Acid is more than 1,000,000 times more acidic than neutral (7 pH) water.
The chart above shows some of the common chemicals that we use in swimming pools, and where they land on the pH spectrum. With such extreme pH differences, is it any wonder why balancing pH can be challenging? Even with the buffering capacity of total alkalinity, keeping pH-controlled for a week is impossible.
The bad habit here is continually trying to get pH down to 7.4, or even lower. And this habit comes from textbooks and industry experts (rightfully) noting the impact of pH on the strength of chlorine. The lower the pH, the stronger the chlorine, because of the higher percentage of Hypochlorous Acid (HOCl). And that's true in pools with zero cyanuric acid.
The problem is, pH has virtually no impact on HOCl percentage in a stabilized pool. So the pH is not nearly as important for sanitization in pools that use CYA.
Think about that for a moment. That fact seems so contrary to everything we in the pool industry have been taught for decades. The pH hardly makes an impact on HOCl percentage (chlorine strength) with CYA present. In fact, it's the free chlorine to CYA ratio (FC:CYA) that determines the strength of chlorine. So why are we so focused on chasing the pH and putting it down to 7.4 again?
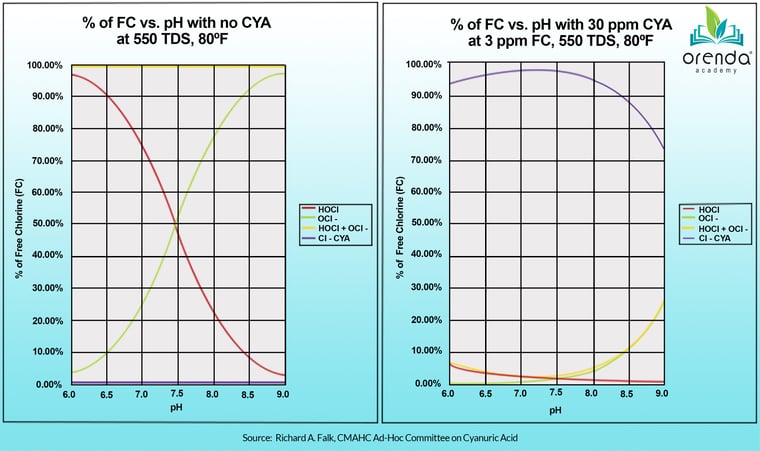
This chart above comes from Richard Falk, a member of the ad-hoc committee for Cyanuric Acid for the CDC's Council for the Model Aquatic Health Code (CMAHC). We didn't make this stuff up. The left chart shows a non-stabilized pool where pH directly controls the HOCl:OCl- relationship. This is what we all know to be true; the lower the pH, the stronger the chlorine. But look over at the right chart, representing a pool with 30 ppm CYA. Where's the red line now?
You see, the % of HOCl barely changes from 7.0 to 8.0, and even 8.5 pH. The vast majority of chlorine is now bound to CYA, forming isocyanurates. You still have FAC that will show up on a test kit, but it will be a bit slower to do its job. Stabilization is beneficial for protecting chlorine from direct sunlight. Over-stabilization is the problem.
But enough about CYA. If you want to learn more about it, minimal CYA is our Fourth Pillar of Proactive Pool Care. We considered making it one of these top 6 habits, but if you are a trichlor user, making the change is not free, and it's not easy to do immediately.
And by the way, the idea that 7.4-7.6 pH is ideal because of bather comfort can be considered a myth. A quick online search brought us to an NIH-published study that showed pH of human tears ranged between 6.5 and 7.6 in their experiment, and the pH of tears tends to change throughout the course of the day. Having more basic water (like 8.0 pH) in your pool is unlikely to cause bather discomfort. Far more important factors for bather comfort are disinfection byproducts like chloramines.
Best-known practices: Don't chase pH, contain it
Instead of insisting pH needs to be within the textbook range of 7.4-7.6 year-round, take a more LSI-focused approach to your chemistry. When the water is really cold, you don't need a 7.4 or 7.6, you want more like a 7.8, 8.0, or even 8.2. You will never hold pH steady because it fluctuates by its very nature. So, rather than trying to nail it down, use the LSI and physics to contain pH.
In another Orenda article, we discuss the physics of Henry's Law and why the pH is naturally rising up to 8.2. But for now, just know the ceiling for pH is about 8.2, unless the water is otherwise forced above that, like with a salt-chlorine generator, or abuse of acid that causes etching.
The best practice for outdoor pools using CYA, aim for a pH adjustment down to perhaps 7.6 or even 7.7. It will be slower to rise because the pH is already closer to 8.2; the closer it gets, the slower the pH naturally rises. This brings us to our #1 worst habit in the pool industry...
1. Abusing Acid
This habit cannot be understated. THIS IS THE BIGGEST, MOST PREVALENT PROBLEM WE SEE ACROSS THE COUNTRY. Acid is involved in probably 90% or more of the problem pools we get called to. There are three levels of this bad habit that we must correct:
- Not dosing acid correctly,
- Not measuring the dose before pouring, and
- Not pouring acid into the pool properly.
Not dosing correctly
How much acid does it take to lower the pH from 8.0 to 7.5 on a 20,000 gallon (75,708 L) pool? If you said half a gallon (64 fl.oz./1.89 L), you are not alone. The problem is, the correct answer is about half of that.

We've got another helpful how-to article about how to safely add acid. In there, we cover this entire bad habit and how to correct it.
To dose acid correctly, you must test water accurately to begin with. This means avoiding bad habits earlier in this article, especially #5 and #3. You need to know the volume of your pool and have an accurate test sample. Then, avoiding bad habit #2, your strategy should not be to drop pH too low but to lower it just enough so that it remains contained. Use the Orenda App calculator for accurate dosing. You can also use reference tables that are available online, or that come with your test kit.
Not measuring
Let's just reiterate the importance of measuring chemicals (bad habit #6). Muriatic acid is more than one million times more acidic than neutral water. If you are off by a few ounces in a backyard pool, that actually matters more than you think. Measure before your pour. And not just because too much acid will overcorrect and cause problems–because it will–but because you're wasting money. It may not seem like much, but if you're off by 4 ounces every time you add acid, and you visit 50 pools a week, that's over a gallon of acid that was wasted. Oh and by the way, that's reducing more alkalinity than planned, so you now need to buy sodium bicarb to replace that. Over the course of a season, it adds up.
Not pouring acid properly
Column pouring is a really bad habit, and a myth. Muriatic acid is about 18% more dense than water, so it plunges to the bottom of the pool. If you have a lighter pool bottom, acid could be part (or all) of the reason why. It sinks, and it destroys. Below is a photo set that shows muriatic acid (with colored dye in it) being column poured into a pool:
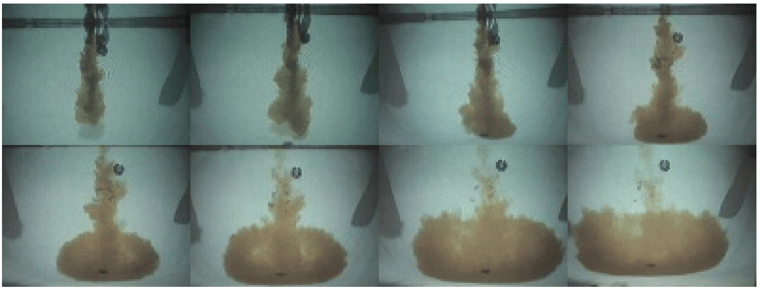
Photo credit: onBalance
No matter how you add acid to a pool, the impact on alkalinity will be identical. pH, however, overcorrects with a column pour, because the acid that sinks to the bottom can pull high-pH calcium hydroxide out of the surface, which neutralizes some of the acid, and does irreversible damage to the pool surface.
Best-known practices: measure and pre-dilute acid
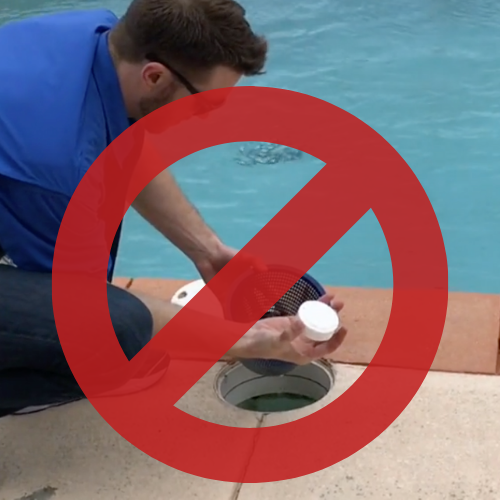
Even if you pour acid around the perimeter of the pool, if you are pouring muriatic directly into the water, it's a bad habit. It will sink down and cause issues over time. If you have ever seen copper in your pool from a stripped-out heat exchanger, acid being poured directly in the pool was a likely culprit.
Hands down, the best way we know to add acid is to pre-dilute a measured amount of it in a bucket of water, then pour it around the perimeter. You want at least a 10:1 dilution ratio, but if you can do more than that, that's even better. To make this habit become a reality, remind yourself to put your acid in an empty bucket in your truck, along with a measuring cup. Simply carry the bucket with the cup and the acid with you, and it should help remind you to measure and pre-dilute.
Here is a how-to video on how to safely and correctly add acid to a swimming pool:
Conclusion
So there you have it. Six of the most prevalent and costly bad habits we see nationwide. If any of these resonated with you, there is an important decision to make. You can either keep doing what you have been doing, or you can step up your game and become better and more profitable.
#6 will save you on wasted chemicals. #5 will also save you on wasted chemicals, or from under-dosing a pool that can lead to bigger problems. #4 will reduce your risk of cold water damage, and also save you chemicals. #3 will save you on replacement reagents and other test kit repairs, as well as give you more accurate chemistry readings. #2 can substantially reduce your acid and sodium bicarb consumption. And #1 will minimize your risk of over-correcting your chemistry and reduce the risk of etching/fading or degrading a vinyl liner or fiberglass surface.
Without charging your customers an extra penny, you can implement these habits for FREE. If you didn't have a thermometer or measuring cups before reading this, those are the only exceptions, and they're just a few dollars apiece. Thanks for your time, and enjoy saving all those dollars.
BONUS: Trichlor tabs in non-trichlor places
There are many bad habits we could have written about. Overstabilization with CYA is a big one, and perhaps bigger than that is seeing Trichlor tabs in skimmers and even pump strainer baskets (cringe). If the device does not specifically say it is for trichlor tabs, do not put trichlor in it. This could be an explosion risk (like putting trichlor in a cal hypo feeder, or vice versa). Trichlor has a 2.8 pH, which is more than 10,000x more acidic than neutral water. Putting it in a skimmer basket puts that super-low pH directly through circulation, and can damage the equipment. Just be aware of it. We cover these topics and more in our free online education program, Orenda Academy™.